Set up the dbt Snowflake Native App preview
The dbt Snowflake Native App enables these features within the Snowflake user interface: dbt Explorer, the Ask dbt chatbot, and dbt Cloud's orchestration observability features.
Configure both dbt Cloud and Snowflake to set up this integration. The high-level steps are described as follows:
- Set up the Ask dbt configuration.
- Configure Snowflake.
- Configure dbt Cloud.
- Purchase and install the dbt Snowflake Native App.
- Configure the app.
- Verify successful installation of the app.
- Onboard new users to the app.
The order of the steps is slightly different if you purchased the public listing of the Native App; you'll start by purchasing the Native App, satisfying the prerequisites, and then completing the remaining steps in order.
Prerequisites
The following are the prerequisites for dbt Cloud and Snowflake.
dbt Cloud
- You must have a dbt Cloud account on the Enterprise plan that's in an AWS Region or Azure region. If you don't already have one, please contact us to get started.
- Currently, Semantic Layer is unavailable for Azure ST instances and the Ask dbt chatbot will not function in the dbt Snowflake Native App without it.
- Your dbt Cloud account must have permission to create a service token. For details, refer to Enterprise permissions.
- There's a dbt Cloud project with Semantic Layer configured and metrics declared.
- You have set up a production deployment environment.
- There has been at least one successful job run that includes a
docs generatestep in the deployment environment.
- There has been at least one successful job run that includes a
Snowflake
- You have ACCOUNTADMIN access in Snowflake.
- Your Snowflake account must have access to the Native App/SPCS integration and NA/SPCS configurations (Public Preview planned at end of June). If you're unsure, please check with your Snowflake account manager.
- The Snowflake account must be in an AWS Region. Azure is not currently supported for Native App/SPCS integration.
- You have access to Snowflake Cortex through your Snowflake permissions and Snowflake Cortex is available in your region. Without this, Ask dbt will not work.
Set up the configuration for Ask dbt
Configure dbt Cloud and Snowflake Cortex to power the Ask dbt chatbot.
-
In dbt Cloud, browse to your Semantic Layer configurations.
- Navigate to the left hand side panel and click your account name. From there, select Account settings. In the left sidebar, select Projects and choose your dbt project from the project list.
- In the Project details panel, click the Edit Semantic Layer Configuration link (which is below the GraphQL URL option).
-
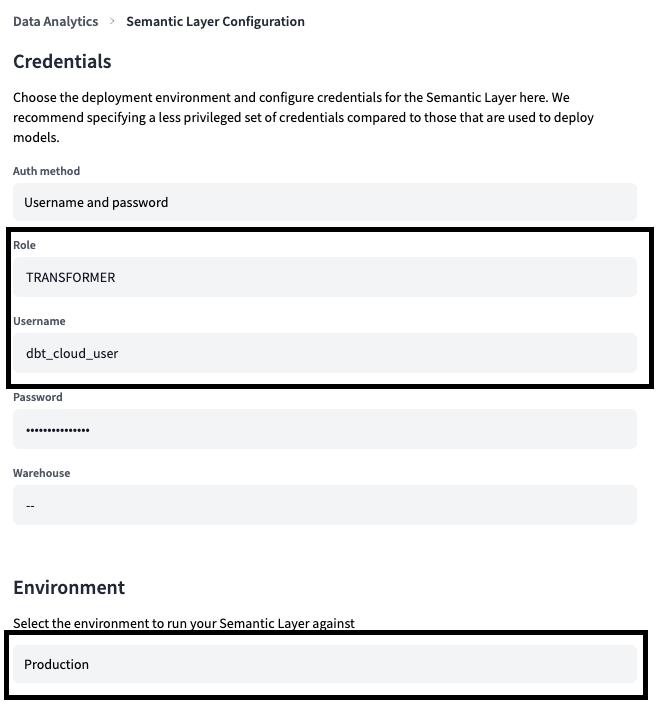
In the Semantic Layer Configuration Details panel, identify the Snowflake credentials (which you'll use to access Snowflake Cortex) and the environment against which the Semantic Layer is run. Save the username, role, and the environment in a temporary location to use later on.
-
In Snowflake, verify that your SL and deployment user has been granted permission to use Snowflake Cortex. For more information, refer to Required Privileges in the Snowflake docs.
By default, all users should have access to Snowflake Cortex. If this is disabled for you, open a Snowflake SQL worksheet and run these statements:
create role cortex_user_role;
grant database role SNOWFLAKE.CORTEX_USER to role cortex_user_role;
grant role cortex_user_role to user SL_USER;
grant role cortex_user_role to user DEPLOYMENT_USER;
Make sure to replace
SNOWFLAKE.CORTEX_USER,DEPLOYMENT_USER, andSL_USERwith the appropriate strings for your environment.
Configure dbt Cloud
Collect the following pieces of information from dbt Cloud to set up the application.
-
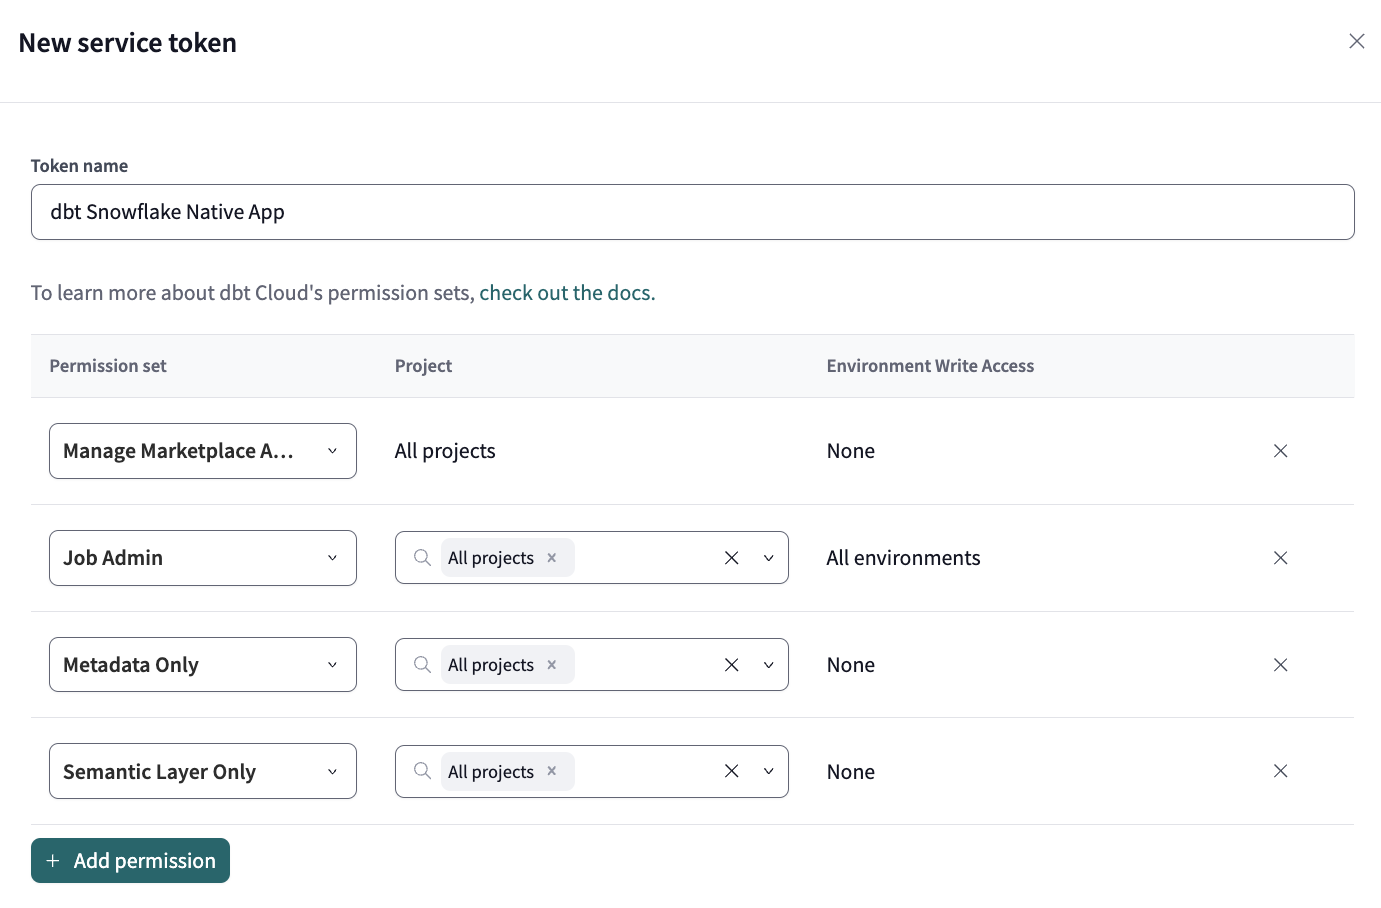
From the gear menu in dbt Cloud, select Account settings. In the left sidebar, select API tokens > Service tokens. Create a service token with access to all the projects you want to access in the dbt Snowflake Native App. Grant these permission sets:
- Manage marketplace apps
- Job Admin
- Metadata Only
- Semantic Layer Only
Make sure to save the token information in a temporary location to use later during Native App configuration.
The following is an example of granting the permission sets to all projects:
-
From the left sidebar, select Account and save this information in a temporary location to use later during Native App configuration:
- Account ID — A numerical string representing your dbt Cloud account.
- Access URL — If you have a North America multi-tenant account, use
cloud.getdbt.comas the access URL. For all other regions, refer to Access, Regions, & IP addresses and look up the access URL you should use in the table.
Install the dbt Snowflake Native App
-
Browse to the listing for the dbt Snowflake Native App:
- Private listing (recommended) — Use the link from the email sent to you.
- Public listing — Navigate to the Snowflake Marketplace.
-
Click Get on the listing to install the dbt Snowflake Native App. This can take several minutes. When installation is complete, an email is sent to you.
A message will appear asking if you want to change the application and grant access to the warehouse for installation. dbt Labs strongly recommends not changing the application name unless necessary.
-
When the dbt Snowflake Native App is successfully installed, click Configure in the modal window.
Configure the dbt Snowflake Native App
-
On the Activate dbt page, click Grant in Step 1: Grant Account Privileges.
-
When privileges have been successfully granted, click Review in Step 2: Allow Connections.
Walk through the Connect to dbt Cloud External Access Integration steps. You will need your dbt Cloud account information that you collected earlier. Enter your account ID, access URL, and API service token as the Secret value when prompted.
-
On the Activate dbt page, click Activate when you've established a successful connection to the dbt Cloud External Access Integration. It can take a few minutes to spin up the required Snowflake services and compute resources.
-
When activation is complete, select the Telemetry tab and enable the option to share your
INFOlogs. The option might take some time to display. This is because Snowflake needs to create the events table so it can be shared. -
When the option is successfully enabled, click Launch app. Then, log in to the app with your Snowflake credentials.
If it redirects you to a Snowsight worksheet (instead of the login page), that means the app hasn't finished installing. You can resolve this issue, typically, by refreshing the page.
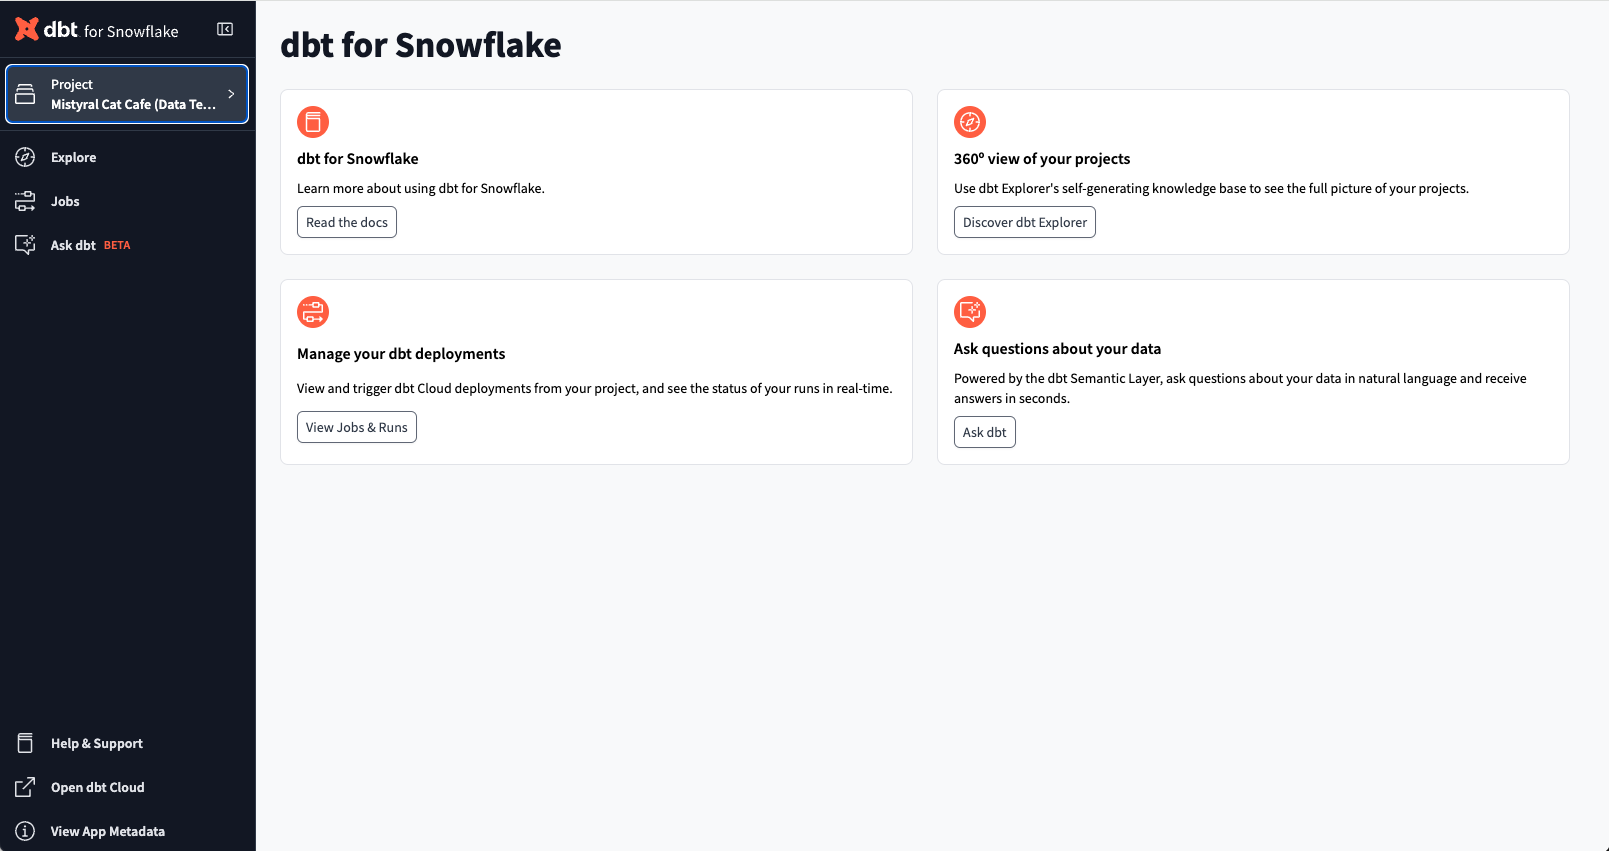
The following is an example of the dbt Snowflake Native App after configuration:
Verify the app installed successfully
To verify the app installed successfully, select any of the following from the sidebar:
- Explore — Launch dbt Explorer and make sure you can access your dbt project information.
- Jobs — Review the run history of the dbt jobs.
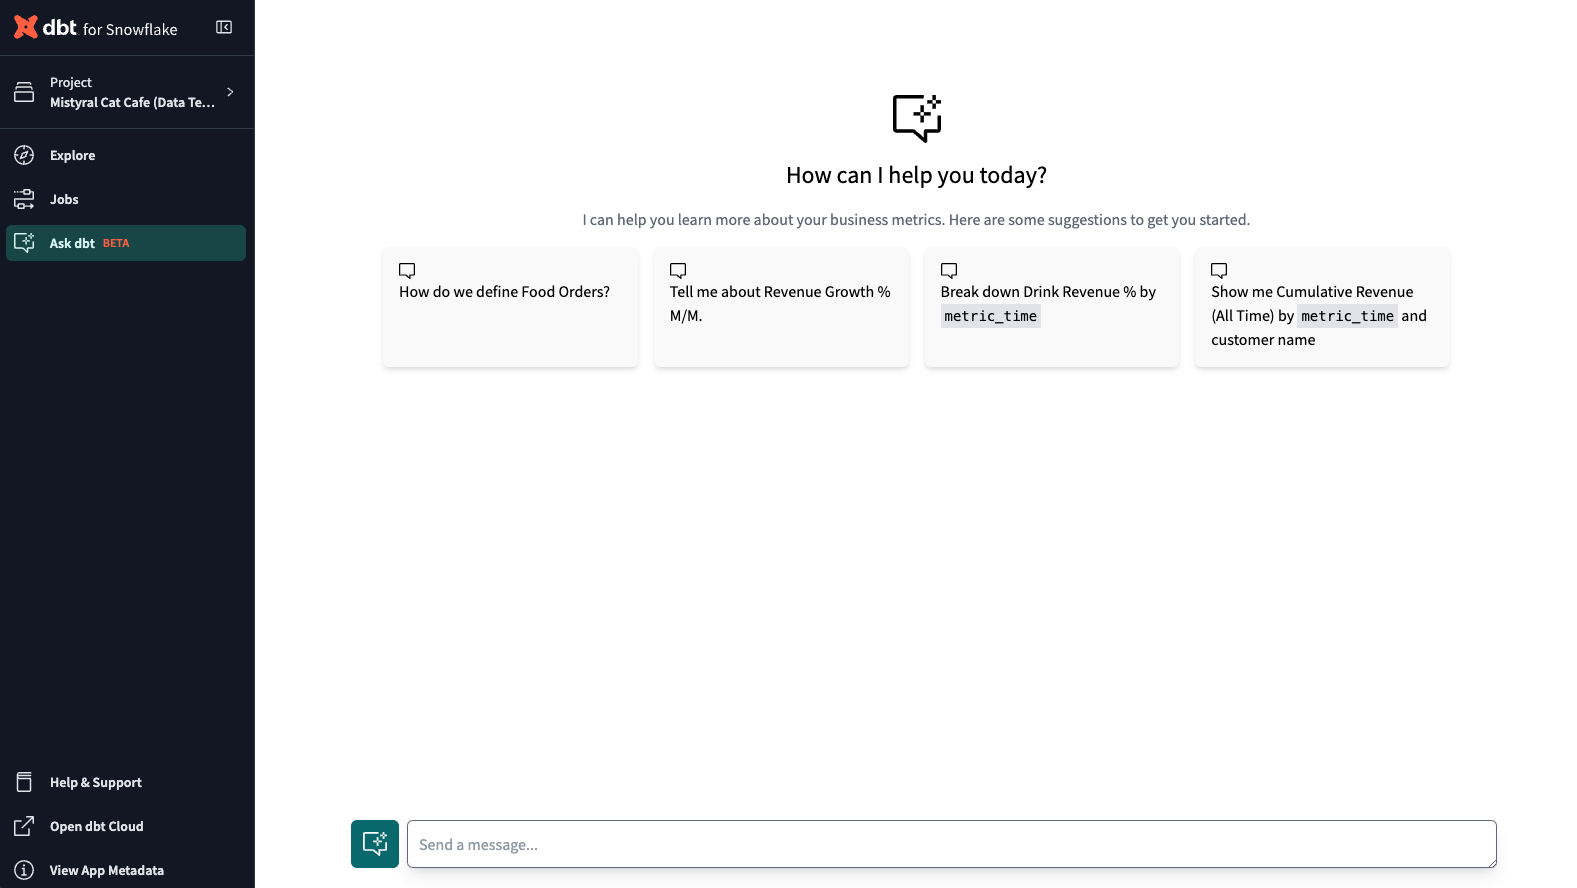
- Ask dbt — Click on any of the suggested prompts to ask the chatbot a question. Depending on the number of metrics that's defined for the dbt project, it can take several minutes to load Ask dbt the first time because dbt is building the Retrieval Augmented Generation (RAG). Subsequent launches will load faster.
The following is an example of the Ask dbt chatbot with the suggested prompts near the top:
Onboard new users
-
From the sidebar in Snowflake, select Data Products > Apps. Choose dbt from the list to open the app's configuration page. Then, click Manage access (in the upper right) to onboard new users to the application. Grant the APP_USER role to the appropriate roles that should have access to the application but not the ability to edit the configurations. Grant APP_ADMIN to roles that should have access to edit or remove the configurations.
-
New users can access the app with either the Snowflake app URL that's been shared with them, or by clicking Launch app from the app's configuration page.


